Posts

Showing posts from 2016

Wet Clay: Finished

Image
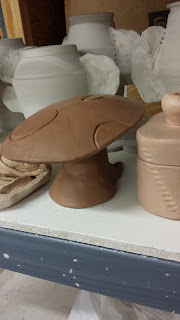
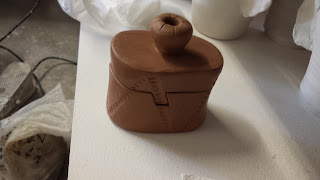
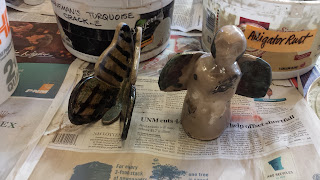
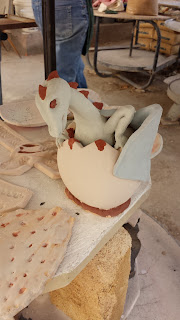
Yeah I couldn't think of a witty title today. But anyway. Tuesday was the last day for wet clay, and also our first raku firing. So first, I had to glaze the mushroom and oval box. I decided to save the fairy hut for tomorrow, when we'll be doing naked raku. I used some bright red underglaze on the top of the mushroom, plus turquoise crackle, tomat's red (I think), and copper luster. Anyway I was trying to go for a pretty brightly colored, contrasting top. I put white crackle on the stem, and then also a few dots of alligator rust on both the top and stem to make it look a bit warty. I forgot to get a picture after that was glazed. For the box, I did black glaze on the zigzags on the bottom, turquoise crackle on the flat part of the top, and glass red on the knob. Both pieces came out great, although I did have 2 small cracks in the mushroom's top. One of the instructors had a piece that cracked, too, and she builds stuff like woah, so I wonder if the temperat

More Plates. All the Plates!

Image
So apparently the theme of this session is plates. I didn't mean for that initially, but it's turned out to be a great platform for all these different decoration techniques. On Saturday, I got a dragon egg and two plates smoothed and ready to be decorated. These are all made with 412/stoney white cone 10 clay. The dragon egg I'll be decorating tonight via the surface erosion technique , where you paint on a resist and then sponge away material, leaving the painted parts raised above the rest of the surface. I'll be using an acrylic medium, not shellac like in that link, as I won't be doing anything nearly that complicated. The plates though I was actually able to decorate on Saturday. For the first, I used an embossing tool to trace a design of Betty White. I'm hoping it looks like her, anyway. I'll use an oxide wash that's wiped off to highlight the carved in design. For the second plate, I used the " mocha diffusion " technique wh

Moving Forward

Image
Tuesday was the most recent class, and we got our saggar pieces ready to go. I forgot to take pics of that, but this time I sprayed the solution (iron something or other) on instead of painting it, which gives more of a speckled look when you spray lightly as I did. For combustibles, I used a little horse hair, a sprinkling of salt, some steel wool fibers, and a sprinkling of the largest fertilizer pellets we had available. Next, I finished up a raku toadstool that I had started before class: I really like how that came out and I think it'll be awesome in my garden. I intend to use some underglazes on the top to get some bright colors, in addition to the raku metallics. Finally, I did the slip trailing on my last dinosaur plate. It was really, really difficult to get even and not smear it or anything. It came out ok, but I think I should have waited until the slip was thicker. I could definitely use some practice on this technique. At the end of class, I also rolle

Time Waits for No Potter

Image
As usual, I didn't get nearly as much done as I had hoped during Saturday's class. To start, I did get the raku box finished off. I got it paddled, cut, and reinforced before class, so I just worked on the knob on top on Saturday. I had put a knob on there at home, but found it was on the small side for the weight of the box, so I embiggened and decorated it. Next, I transferred the design for the slip trailing onto my leather hard plate. It's another dinosaur, of course. Unfortunately the slip was still too thin, so I didn't get the actual slip trailing done. So I wrapped the piece well and hope to do that tonight. Finally, I made my saggar piece out of cone 5 clay (b-mix, I think). I had completely forgotten about the whole saggar thing, but we're doing the saggar firing tonight, so it had to be finished on Saturday. I made this pseudo flower thing after first attempting to wrap the clay around a balloon; that didn't work out because the c

Surface Decoration Techniques, Part II

Image
I continued working on surface decorating at last night's class. Over the weekend I had finished the sgraffito piece, so I just had to set it out to dry: I call this one "Apatosaurus Under the Rising Sun". Or something. Anyway I quite like how it came out, though it was a little difficult keeping the edges of the carving smooth. I also made a third plate with the scraps from the last 2 plates (which was a weird pain; the scraps didn't seem that dry but were very hard, so it took a ton of wedging): It's not very exciting yet, because I want to do slip trailing on this one. That means using a squirt bottle type thing with a very thin nozzle to draw a design on the clay using an underglaze. Unfortunately the underglazes have to be prepped for that. They have to be pretty runny and there needs to not be any clumps, so they actually get forced through a sieve. Our teacher will work on that before the next class, so I'll be able to finish this on Saturday.

Adventures in Surface Decoration

Image
Saturday was the second class. I just continued work on the things I started in the first session, primarily making small plates of cone 5 b-mix to experiment with different surface decoration techniques. I finished this plate using the mishima technique: That means I carved the design into the leather hard clay, then painted it with colored underglaze. After that dried I wiped away the excess with a damp sponge, leaving only the lines colored. Unfortunately I think I had my sponge a little too damp, so in some places too much of the underglaze was washed off. I'm hoping I can touch this up after it's bisqued, if necessary. I call this one "T-Rex Under the Moon". Next, I made a second small plate: This guy was painted with underglaze when it was leather hard, and then at home I carved a design into it, per the sgraffito technique. So it's basically the opposite of the other plate. I'll post pics for that later. It turned out mostly ok, though the lines

And we're back.

Image
Yesterday was the start of the summer pottery class session. No pics yet, since I just barely got started on stuff last night. Plus there was that whole dead phone issue. It was a very interesting session though. Our teacher brought in samples of a ton of different types of surface decoration ( sgraffito ,  mishima , and a bunch I can't remember right now) and challenged us to make some pieces incorporating some of those techniques. This session we're going to do a cone 5 firing in addition to our regular cone 10. The underglazes we have available result in brighter colors at the lower temperature, so we can show off these techniques with more vivid colors. Cool! I had already decided to do another dragon egg, but with more interesting decoration, so this fits in just perfectly. I'm not sure what I'll do for that, exactly, so first I'm taking the opportunity with the cone 5 clay (b-mix) to make a couple of small slab-built, molded bowls or plates and try out some

Glaze Day or Bust!

Image
Saturday was Glaze Day. I only had 4 pieces for the traditional high-fire glazing, but I also had pieces to raku. The only new piece was the top of my egg, which I completely forgot about the previous week (oops). I also had two older pieces I wanted to re-fire because I didn't like how they'd come out. Here they are before I did anything to them: That's one of the nice things about raku; do-overs aren't too hard to do. There was enough room for my two older pieces, so I reglazed them and they were fired on Saturday in two separate firings (that makes *three* for this session! we apparently love our raku around here!). I put curdle blue on the top part of the butterfly's wings and glass red on the lower part. I also added just a bit more alligator rust to the body. I put white crackle on the head and body of the angel, plus glass red on the wings and in splotches here and there on the rest of the piece. Here they are after applying new glaze, and then after t

The End is Nigh

Image
Saturday was the last day for wet clay. I couldn't really do anything new on the wheel, mainly because it wouldn't dry fast enough to trim or to be ready to be bisqued in time for this coming Saturday, which will be Glaze Day. I did manage to trim my final cylinder-thing without destroying it, so yay. I completely forgot to take a photo though, because Saturday was really quite hectic. We did a raku firing, which ate up a lot of time; first I had to paint my dragon with raku glazes, like so: I always think it's neat to see what the glazes look like first. Some of the newbies kept thinking the final color would look like the color when it's not yet fired, and that's definitely not always the case. I put white crackle on the shell (though alas, it didn't really crackle), alligator rust on the main body, glass red on the spines, black on the eyes, and a new glaze on the wings. It was technically a regular low-fire glaze, I believe, but our teacher speculated