Posts

Showing posts with the label dragon-egg

Wet Clay: Finished

Image
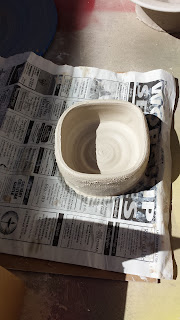
Yeah I couldn't think of a witty title today. But anyway. Tuesday was the last day for wet clay, and also our first raku firing. So first, I had to glaze the mushroom and oval box. I decided to save the fairy hut for tomorrow, when we'll be doing naked raku. I used some bright red underglaze on the top of the mushroom, plus turquoise crackle, tomat's red (I think), and copper luster. Anyway I was trying to go for a pretty brightly colored, contrasting top. I put white crackle on the stem, and then also a few dots of alligator rust on both the top and stem to make it look a bit warty. I forgot to get a picture after that was glazed. For the box, I did black glaze on the zigzags on the bottom, turquoise crackle on the flat part of the top, and glass red on the knob. Both pieces came out great, although I did have 2 small cracks in the mushroom's top. One of the instructors had a piece that cracked, too, and she builds stuff like woah, so I wonder if the temperat...

More Plates. All the Plates!

Image
So apparently the theme of this session is plates. I didn't mean for that initially, but it's turned out to be a great platform for all these different decoration techniques. On Saturday, I got a dragon egg and two plates smoothed and ready to be decorated. These are all made with 412/stoney white cone 10 clay. The dragon egg I'll be decorating tonight via the surface erosion technique , where you paint on a resist and then sponge away material, leaving the painted parts raised above the rest of the surface. I'll be using an acrylic medium, not shellac like in that link, as I won't be doing anything nearly that complicated. The plates though I was actually able to decorate on Saturday. For the first, I used an embossing tool to trace a design of Betty White. I'm hoping it looks like her, anyway. I'll use an oxide wash that's wiped off to highlight the carved in design. For the second plate, I used the " mocha diffusion " technique wh...

The End is Nigh

Image
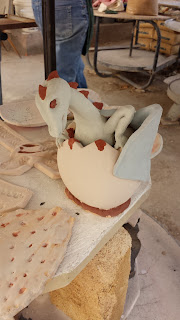
Saturday was the last day for wet clay. I couldn't really do anything new on the wheel, mainly because it wouldn't dry fast enough to trim or to be ready to be bisqued in time for this coming Saturday, which will be Glaze Day. I did manage to trim my final cylinder-thing without destroying it, so yay. I completely forgot to take a photo though, because Saturday was really quite hectic. We did a raku firing, which ate up a lot of time; first I had to paint my dragon with raku glazes, like so: I always think it's neat to see what the glazes look like first. Some of the newbies kept thinking the final color would look like the color when it's not yet fired, and that's definitely not always the case. I put white crackle on the shell (though alas, it didn't really crackle), alligator rust on the main body, glass red on the spines, black on the eyes, and a new glaze on the wings. It was technically a regular low-fire glaze, I believe, but our teacher speculated ...

Assorted Clay-Related Activities

Image
Saturday was the fourth class of this session, and I did a little of this and that. The first order of business was getting our bisqued saggar pieces ready for the actual saggar process. I would have taken pics, but my hands had toxic chemicals on them, and I wasn't gonna get that stuff on my phone... First we all donned gloves, and then for people who wanted a pink color to come out during the firing, we painted a solution on our pieces (while wearing face masks... Lots of protective gear during this process!). I failed to ask what was in the solution, but you apparently aren't supposed to get it on your skin. Anyway next, you tear off 2 pieces of aluminum foil large enough to securely wrap your piece in. You then add various types of combustibles, including organic matter like banana peels, horse hair, cat or dog food, or leaves, as well as powdered household chemicals like fertilizer or weed killer, and finally small bits of metal, such as a bit of steel wool or a bit from a...

Of Dragon Eggs and Broken Pots

Image
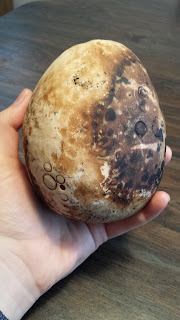
During the week I got my dragon egg for saggar mostly finished. It's made around wadded up newspaper as per the "clay potato" technique, plus I did go ahead add two chunks of clay inside the paper so they'll rattle around inside the egg after it's finished, suggesting something's inside. Here it is after I added the first vein, as an experiment: I was pleased with how it looked, so I added 2 more veins. During Saturday's class I finished smoothing the egg's surface out as much as possible, shaped it a bit more, and added a crack so it would look like the egg's inhabitant was attempting to escape. That also conveniently made a nice big opening for expanding air to escape from during firing. I also smushed the veiny bits by paddling them, following a suggestion from my teacher. It makes the veins look a bit more a part of the egg, in my opinion, so I'm quite happy with the effect. Overall I think it turned out pretty well: Saggar fir...

Third Time's a Charm

Image
Ok, so, I never actually documented my projects last summer like I had intended, nor did I record the fall session. But hey, it's a new pottery session (started last Saturday, ), so might as well give it another go. We'll be doing raku like usual, as well as a saggar firing  (you coat the piece in a special chemical, then wrap it up in aluminum foil with some combustibles, and fire it like that). Last session we tried obvara for the first time, but pieces had an unfortunate tendency to crack and/or blow up. One takes the red hot piece out of the kiln, dunks it in a "brew" of water, flour, sugar, and yeast and then dunks the piece in water, going back and forth between the two a few times. So, you know, blowing up happens... We voted on which special firing techniques to do this session and I'm guessing that's why obvara lost. Ah, well. My plans for the special firings are to make dragon eggs. I made an obvara dragon egg last session which somehow did not...