Assorted Clay-Related Activities
Saturday was the fourth class of this session, and I did a little of this and that. The first order of business was getting our bisqued saggar pieces ready for the actual saggar process. I would have taken pics, but my hands had toxic chemicals on them, and I wasn't gonna get that stuff on my phone... First we all donned gloves, and then for people who wanted a pink color to come out during the firing, we painted a solution on our pieces (while wearing face masks... Lots of protective gear during this process!). I failed to ask what was in the solution, but you apparently aren't supposed to get it on your skin. Anyway next, you tear off 2 pieces of aluminum foil large enough to securely wrap your piece in. You then add various types of combustibles, including organic matter like banana peels, horse hair, cat or dog food, or leaves, as well as powdered household chemicals like fertilizer or weed killer, and finally small bits of metal, such as a bit of steel wool or a bit from a copper scrubber. Each thing gives different effects, sometimes colors, other times just an interesting burn mark. You don't want to use too much, because you can end up with a piece that's all black from all the smoke. I used some pine needles, a bit of copper scrubber, and Miracle Grow. You wrap the piece in foil while distributing the combustibles, so that the foil holds the stuff in place. You can then poke holes in that layer of foil and it'll result in lighter (white or whitish) spots on the finished piece. So I did poke a few holes, as I wanted to see how that would look. Finally you wrap a second layer of foil very securely around the piece, and then it's all ready to go into the kiln. The pieces got fired during class but were still too hot to unwrap, so I'll have to wait until next week to see how my dragon egg looks!
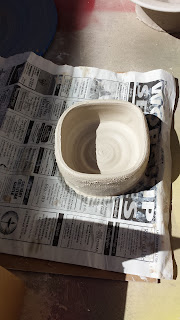
Next I attempted more throwing. I did manage to make another round thing, fairly cylindrical, although it got a tiny bit squished when I was taking it off of the wheel. I went with the squish and squared it off a bit on purpose. So here's a picture of that:
I also watched (very intently) a demo on throwing a bowl on purpose, and another on throwing a plate. Watching the centering for the bowl helped, and I think I'm getting the hang of it a little better. It's still very hard though!
Next I trimmed the bowl I made 2 weeks ago. I succeeded in not destroying it, so yay! It was a bit of a challenge getting it centered to trim, as the top and bottom of the piece didn't quite match. One was offset from the other. But somehow or other I got it trimmed, so here it is:

All of that pretty much ate up my class time. I wasn't able to work on my raku dragon egg during class at all, so I had to finish that at home. I had already gotten the egg formed, shaped, and cut off the top during the week last week:

Then this week I made the actual dragon hatching out of the egg. I finished it later than I wanted, so now there's some question as to whether it'll be dry in time for the bisque firing, but I did get it done:


The body is supported by newspaper, and then I made the neck hollow. After it was done and had set up a bit I poked holes in the head, going in through the mouth, so that it'd dry better and hopefully reduce the chances of cracking during firing and all. The head is really the only thick bit, so I think it'll turn out ok. I'm really pleased with the looks of this, at least. I've been wanting to make a dragon for quite awhile, as I <3 dragons, but I was rather intimidated. They frequently have a lot of fiddly, complicated bits, if you think about it. So I'm happy this turned out so well and that the head does look nicely dragonish.
And that has been my Week in Pottery. It was rather hectic trying to get the baby dragon finished in time!
Next I attempted more throwing. I did manage to make another round thing, fairly cylindrical, although it got a tiny bit squished when I was taking it off of the wheel. I went with the squish and squared it off a bit on purpose. So here's a picture of that:

I also watched (very intently) a demo on throwing a bowl on purpose, and another on throwing a plate. Watching the centering for the bowl helped, and I think I'm getting the hang of it a little better. It's still very hard though!
Next I trimmed the bowl I made 2 weeks ago. I succeeded in not destroying it, so yay! It was a bit of a challenge getting it centered to trim, as the top and bottom of the piece didn't quite match. One was offset from the other. But somehow or other I got it trimmed, so here it is:

All of that pretty much ate up my class time. I wasn't able to work on my raku dragon egg during class at all, so I had to finish that at home. I had already gotten the egg formed, shaped, and cut off the top during the week last week:

Then this week I made the actual dragon hatching out of the egg. I finished it later than I wanted, so now there's some question as to whether it'll be dry in time for the bisque firing, but I did get it done:


The body is supported by newspaper, and then I made the neck hollow. After it was done and had set up a bit I poked holes in the head, going in through the mouth, so that it'd dry better and hopefully reduce the chances of cracking during firing and all. The head is really the only thick bit, so I think it'll turn out ok. I'm really pleased with the looks of this, at least. I've been wanting to make a dragon for quite awhile, as I <3 dragons, but I was rather intimidated. They frequently have a lot of fiddly, complicated bits, if you think about it. So I'm happy this turned out so well and that the head does look nicely dragonish.
And that has been my Week in Pottery. It was rather hectic trying to get the baby dragon finished in time!


Comments
Post a Comment