Posts

Assorted Clay-Related Activities
Image
Saturday was the fourth class of this session, and I did a little of this and that. The first order of business was getting our bisqued saggar pieces ready for the actual saggar process. I would have taken pics, but my hands had toxic chemicals on them, and I wasn't gonna get that stuff on my phone... First we all donned gloves, and then for people who wanted a pink color to come out during the firing, we painted a solution on our pieces (while wearing face masks... Lots of protective gear during this process!). I failed to ask what was in the solution, but you apparently aren't supposed to get it on your skin. Anyway next, you tear off 2 pieces of aluminum foil large enough to securely wrap your piece in. You then add various types of combustibles, including organic matter like banana peels, horse hair, cat or dog food, or leaves, as well as powdered household chemicals like fertilizer or weed killer, and finally small bits of metal, such as a bit of steel wool or a bit from a...

Of Dragon Eggs and Broken Pots

Image
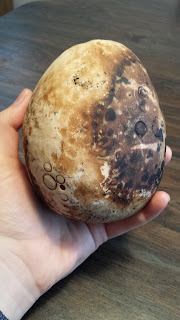
During the week I got my dragon egg for saggar mostly finished. It's made around wadded up newspaper as per the "clay potato" technique, plus I did go ahead add two chunks of clay inside the paper so they'll rattle around inside the egg after it's finished, suggesting something's inside. Here it is after I added the first vein, as an experiment: I was pleased with how it looked, so I added 2 more veins. During Saturday's class I finished smoothing the egg's surface out as much as possible, shaped it a bit more, and added a crack so it would look like the egg's inhabitant was attempting to escape. That also conveniently made a nice big opening for expanding air to escape from during firing. I also smushed the veiny bits by paddling them, following a suggestion from my teacher. It makes the veins look a bit more a part of the egg, in my opinion, so I'm quite happy with the effect. Overall I think it turned out pretty well: Saggar fir...

Two in a Row!

Image
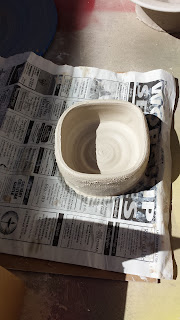
The second class of the session has come and gone. Our teacher always uses the second class to teach the newbies how to throw, so I listened hard and attempted to follow along. I managed to turn out two specimens of roundness: a bowl and a cylinder, again using half-and-half I had leftover. I'll have to break into some of my other clay leftovers at some point, I think; I'd forgotten that if you're actually successfully throwing stuff you can go through clay much more quickly than with hand-building (well, at least with my rather perfectionist standards of hand-building). So hey, maybe I can use up my vast stock of leftovers. Wouldn't that be something! Anyway, I had actually attempted to make two cylinders, but as our teacher always says, "bowls happen". It's pretty easy to make a bowl, but keeping the sides straight and making a cylinder is much more difficult, which is why our teacher has us aim for cylinders at first. The bowl did indeed happen first,...

Third Time's a Charm

Image
Ok, so, I never actually documented my projects last summer like I had intended, nor did I record the fall session. But hey, it's a new pottery session (started last Saturday, ), so might as well give it another go. We'll be doing raku like usual, as well as a saggar firing  (you coat the piece in a special chemical, then wrap it up in aluminum foil with some combustibles, and fire it like that). Last session we tried obvara for the first time, but pieces had an unfortunate tendency to crack and/or blow up. One takes the red hot piece out of the kiln, dunks it in a "brew" of water, flour, sugar, and yeast and then dunks the piece in water, going back and forth between the two a few times. So, you know, blowing up happens... We voted on which special firing techniques to do this session and I'm guessing that's why obvara lost. Ah, well. My plans for the special firings are to make dragon eggs. I made an obvara dragon egg last session which somehow did not...

I'm Not Dead Yet

So for unknown reasons I more or less stopped posting in this blog 2 years ago. Obviously. I'm not actually sure why... I failed to document several pottery sessions, which is a shame.  I kept meaning to start posting again as I took pottery this summer, but then kept getting busy and forgetting. But I figure now's as good a time as ever. I will attempt to document what I did this session and then hopefully I'll keep it up moving into the next session. The format for the pottery classes has changed slightly, in that now we actually get a personal stock of clay with our supply fee, and then if we use more we can purchase more. I, being a perfectionist, always end up with not many projects because I spend loads of time on each. So I used only about half of the 25 lbs of clay we were allotted. I have a decent amount of 1/2 and 1/2 left, plus a small amount of red raku clay and 10 (or was it 5?) lbs of porcelain. The latter I didn't touch at all. Oops. My goal before the ...

The End... Only Not So Much.

Image
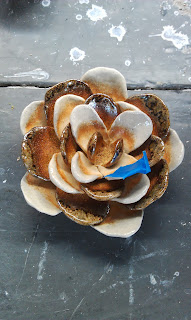
Finally, last night the kiln used for the soda firing and the main kiln (used for the cone 10 firing, in which the majority of pieces went... at least the majority of everybody else's pieces ;) ) were unpacked. My flower came out gorgeous and it'll be going into the show. For the summer class, there's generally an art show put on with the students' and teachers' best pieces; everybody always has at least one or two things that turn out well, and they get put in a gallery with fancy lighting and it's just awesome. So anyway my flower and my horsehair piece will be going into the show for sure. Cthulhu or my teapot may go in, as well, but as the teapot wasn't yet fired our teacher hasn't yet made up her mind about it. The blue tape on my flower marked it as something our teacher wanted in the show. ;) Other than watching the main kiln being unpacked, I also glazed my spoon rests, as they had been bisqued. I did one each in Emily's Purple, Michi...

Glaze Day

Image
Saturday, August 3, was Glaze Day. As it happened, I only had a single thing to glaze: my teapot. My spoon rests were still being bisqued, and everything else was fired using an alternative firing method (my flower was still in the process of being soda fired, in fact), so the teapot was it. This turned out to be a very good thing, as it took an inordinate amount of time to finish the teapot. I painted it with underglazes, so it was a very meticulous and time-consuming affair, as I had to make sure all the nooks and crannies were colored, that there was even coverage and no splotches, etc. I was at it for at least 2 hours, I think. I painted the eyes blue, with black pupils and lighter blue lines in the irises, so they aren't so monochromatic. I painted the hair and eyebrows black, then added small lines of brown, to try and give them some depth. Finally I painted the body and trunk light grey; I tried to thin out the glaze a fair amount as I was a little worried it might come out ...